Time for the fun stuff 😀
On my previous posts (here and here) I talked about what made me decide to go for a physical server, the parts that I selected considering my budget and the lowest noise possible and today I will talk about the logical design behind the lab.
I will use my physical server mainly to host nested environments as I have plenty of resources for that. I can run multiple versions of the same product, destroy and recreate everything without having the need to reinstall the whole lab.
Without further ado, this is my lab
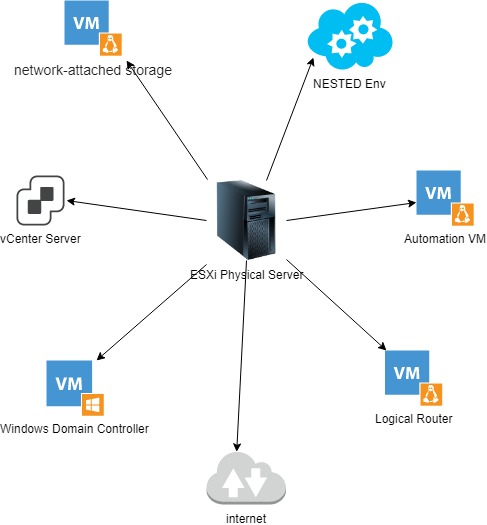
Now that you’ve seen it let’s talk a little bit about every component and why I do have them.
vCenter Server: vCenter Server Appliance with embedded PSC and it serves the purpose of being able to use instant clones and to clone VMs;
Windows Domain Controller: it serves as DNS/AD/DHCP for the first layer of VMs and for the nested environment;
Logical Router: using pfSense for routing and protection (firewall) the NESTED environment;
Automation VM: Ubuntu with Terraform/Ansible. Will be used for deploying the NESTED Env as well as some Kubernetes clusters;
Network-Attached Storage: running Free-NAS to provide storage for the NESTED Env
NESTED Env: Instant clones from ESXi prebuilt and prepared for it, you can read all about that in VirtuallyGhetto Later I will migrate the deployment from PowerCLI to Terraform.
Now for the network configuration
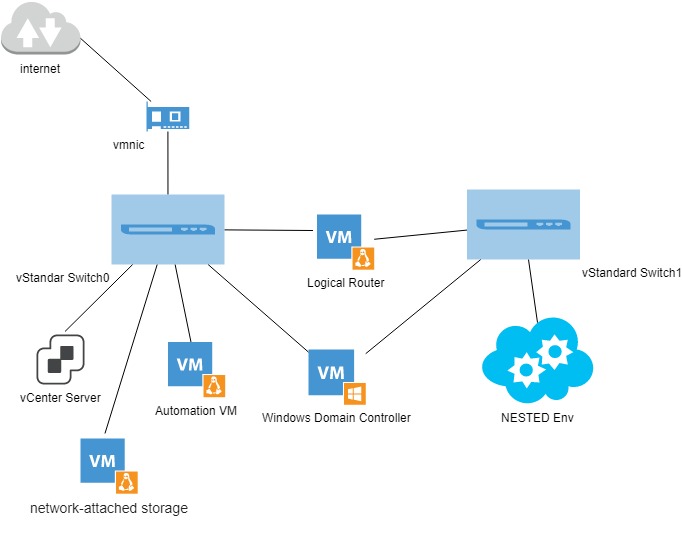
I know that this looks very simple for the great majority of you guys but if you are just starting and have no bases on how VMware works I hope this helps. With that being said let me explain the setup.
I have two switches right now switch0 and switch1.
vStandard switch 0 is for management, has one uplink, accommodates all the management VMs and it’s connected to the internet.
vStandard switch 1 serves the NESTED Env with no uplink so everything inside it is isolated from the outside world. Besides this, there are two VMs connected to it as well, Windows Domain Controller and Logical Router. The Logical Router, as the name suggests acts as a router between the NESTED Env and everything else if needed (internet, vCenter, network-attached storage…). I connected the Windows Domain Controller directly to this switch because I want for it to serve as a DHCP/DNS server for the NESTED Env which have a different IP range (172.21.30.0) from all the other VMs (192.168.0.0). In the future, I am thinking about letting the Logical Router do the DHCP part and disconnect the Windows Domain Controller but for now, let’s keep it like this.
And this covers the basic setup of the environment. On my next posts, I’ll show you guys how I installed and configure some of the components.
As always,
Have fun and KISS
Leave a Reply